The screen is divided into two areas, the drawing area and the control area. Essentially, the drawing area is where your tiling pattern will be created and the control area is where you can change the drawing aspects such as pen color and background color.
Dragging or clicking the mouse within the drawing area will place dots onto the page which will then be immediately duplicated across the entire drawing area according to the rules specified by the chosen net type. The dots will appear in the color chosen for the pen or if the program is in erase mode then any dots present will be removed.
The control area consists of several gadgets that allow you to change drawing properties. The menu of choices in the top left allows you to change the net type which will affect how the dots are duplicated accross the whole image. Changing the net type will alter the description that appears in the text box just to the left. To the right of the text box there are two buttons, "Grid" and "Clear". The "Grid" button will toggle the presence of a grid in the drawing area so that it is easier to locate central net points. The "Clear" button will erase all dots currently on the drawing area and clear it to the background color. Underneath all of these buttons there are controls that allow you to change either the background or pen color. The toggle buttons at the far left decide which color you are changing. The middle space shows the current color being used and the three scroll bars allow you to change the current red, green and blue components of the current color. Note: due to the way that the dots are stored, it would be a good idea to pick the background color before drawing anything.
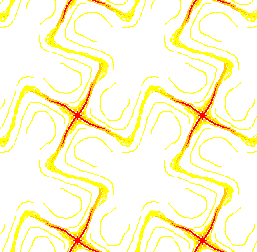
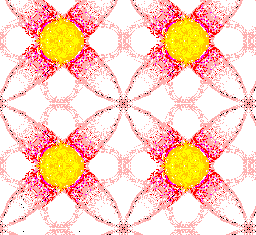
The problem that this assignment addresses is the proper generation of overlapping tiles. This topic has been studied before and one of the results was a set of tiling patterns called Frieze tiles. Frieze tile patterns use affine transformations combined with the concept of a node net to generate sometimes stunning repeating patterns of 1 to 6 fold geometry. In this paper I will discuss some of the specifics of these transformations as well as how I implemented this assignment in the language Java.
The types of transformations that are used in the generation of Frieze tiles include translations, glides, reflections, and rotations. Translations are incorporated with the concept of a 'net'. A net is a set of nodes which are separated by instantiation of a pair of translations u,v. The five basic net types use in Frieze tiles are rectangular, square, parallelogram, hexagonal and centered.
Rectangular nodes require only that the two tranlations produce vectors that are perpedicular to one another. Square nodes are a special case of rectangular that require that the length of the vectors be equal. Parallelogram, is the general case and can be used for almost all techniques except when 3 or 6 fold rotations are required. Hexagonal nodes are composed of two vectors that are 60 degrees apart and of equal distance. The final net is a special case of rectangular which includes the central point of the rectangle as a node.
Once a net type has been chosen, then one or more affine transformations are chosen to couple with the net node to produce a unique pattern. The affine transformations include, reflections, glides, and rotations. Up to two reflections can be used within the pattern; the reflections occur either along one of the translation vectors. A glide is a combination of a relfection and a translation. The glide would normally translate along one of the vectors, half the length of the vector and then reflect itself accross that vector. Rotations occur at the nodes themselves and can be of type 1/1, 1/2, 1/3, 1/4 or 1/6 where the denominator determines the number of copies that exist in a full rotation of 360 degrees.